Sunday, December 18, 2016

A Vintage Christmas


Decorating for Christmas has been especially fun this year!  For the first time ever in my whole life, we have lights on the exterior of our house.  We have two trees up only inches away from each other. And I finally own a vintage tinsel tree!  So take a peek at Christmas at the Craftsman!

Christmas on the mantel.......


This is my favorite way to display all of my vintage Shiny Brites.

*   *   *   *

Christmas on the dining room table........


All my bottle brush trees are in a grouping on our table as a fun centerpiece....


And there she is.  That beauty of a tinsel tree.  She (it's a girl) arrived in her original box with each branch still in its original sleeve (along with the assembly directions too).  I bought it from a friend after I posted about wanting one on Facebook!  The magic of social media.  

Just a wall away from the tinsel tree is our other tree......

  
That wall divides the living room and dining room.  I wanted one tree to be seen from the street, and since you can't put lights on a tinsel tree, that tree won!  

Another win goes to colorful lights.  Multi-colored lights went on the tree to match our exterior lights.........


When I saw those vintage inspired bulbs in all the fun colors, I knew my original plan for white lights was out.

And how about those wreaths???  THEY WERE THE MISTER'S IDEA!  

As I was choosing which lights to buy, the mister wandered off.  When I found him, he said he was looking for wreaths to hang on our porch.

Swoon.

*   *   *   *

So there you have it!  Christmas at the Craftsman.......vintage all around.  Or at least vintage inspired.  

By next Christmas, I'd like to have a new collection going strong......those ceramic Christmas trees that light up......lots of them......for the top of my piano.  

#goals


Sunday, December 4, 2016

Dining Room Makeover


Did you know that painting walls makes you do strange things like volunteer to host Thanksgiving?  Not just your family, but the mister's too.  At the same time.

Be warned.

That's exactly what happened.

We painted these lovely lime walls.......


And the plan kicked into action.

But this isn't about Thanksgiving.

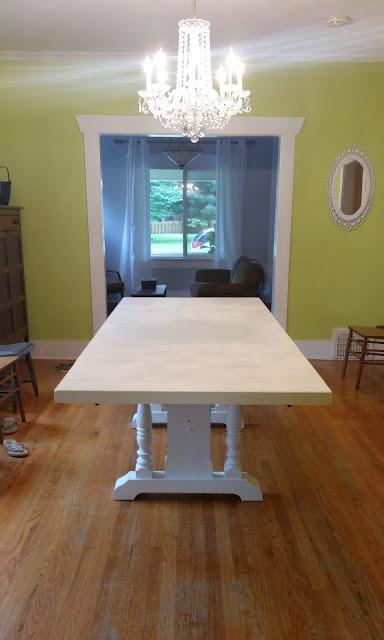
It's about our super cheap dining room makeover!  Cheap because we brought our chandelier with us from our previous house. And also because we received a free table that we just updated with paint.

The next thing on our list was to paint the walls and find chairs.  I wanted fresh, clean, and bright, so white to the rescue!  Of course, we weren't sure how we'd like white everything until it was finished, but when it was done..........WHOA!  We loved it.......

  
The most expensive part of the makeover was the set of windsor chairs.  I had hoped to pull off the mismatched look, but my brain couldn't take it.  The uneven heights, the different angle of the chair legs.  Couldn't handle it.  #imcrazy

So I shopped online for chairs and found a few before I decided on a set.  Target had similar chairs that I loved, but much pricier.  And I found another option that I liked the shape of, but you had to assemble them.  So Furniture Row won.

AND THEN.........my mom surprised me by buying them for Christmas!

So when I say cheap makeover, I'm not kidding.  Other than the chairs, the most expensive item was the ceiling medallion.  All the other money was spent on a few gallons of paint and new electrical outlets.

Now you might be wondering about all the white.  Never fear, the room isn't void of color.  We painted the basement door.....


And the search is on for the perfect pair of (not-white) curtains.  I also plan to hang a huge stained glass piece my dad made when I was a little girl, which is full of color.

So there you have it.  One of the most satisfying before and afters ever........


And.......everyone survived Thanksgiving.


Monday, November 7, 2016

Fashion Victim


Once upon a time, I wrote "fashion" posts.

Quite a few of them actually.

In approximately 50% of them (or more) I wore my most favorite riding boots EVER.  They could never be replaced.  I should have purchased ten pair, prepping for the day they were no longer available.

That day happened.

This year, Victoria's Secret quit selling them.  Devastation.

The hunt was on for their replacement.  Because I had worn them into the ground.  They were beyond repair.....


There was no getting another winter out of them.

So the shopping began.  I ordered two different boots online, both got returned.  I tried on countless styles in shoe stores.  And of course, nothing held a candle to the holy grail of boots, which I knew I would never own.

Until I walked in my house to find this waiting for me......


THE Frye Melissa Button riding boots.

That darling mister of mine had ordered them as an early Christmas present!

I wore them the very next day.  (No fashion post to show for it though.  I should probably stick to booth and house stuff.)

Now THESE are my most favorite riding boots ever.


Sunday, September 25, 2016

The Vintage Peddler


A new antique shop opened very close to my house.  And I sort of snagged a booth there.

Yes, that's booth number four.

Booth four is at The Vintage Peddler.

Since the mall is brand new, we got a framed out booth that we could have our way with.  The owner left the booths that way so that each vendor could make their space unique.  So we shiplapped the back wall.........


I love walking up and seeing that wall with the handkerchief bunting.

We hung pegboard on the other walls, which we covered with burlap.

Then we filled it up.........


The booth spaces there are month to month, so I figured this little experiment at another antique mall couldn't hurt.

You can check out my inventory on Facebook!  There's an album dedicated to The Vintage Peddler, as well as my Relics booths!

I'm crossing my fingers that this new antique mall takes off!


Sunday, August 28, 2016

Table Talk


Our to-do list around here is a mile long.  Some things are $$$$ and are pretty far down the list.  But some things are less expensive, and all we need is time!  Time was abundant this summer, so one of those cheaper things got crossed off the list!

Let me back up a little though.

The home we sold a year ago had two smaller eating areas, so we had two smaller dining sets.  Neither of which would work in our 1921 Craftsman as there is only one dining space here, and it is B.I.G.  Luckily, the mister's aunt had a large, old trestle table just sitting in storage that we were happy to latch on to for the time being.  And it was free.

But it was not pretty.......


There was damage to the top in the form of melted wax that had eaten into the wood.  But nothing a little wood filler and paint couldn't cover.

Now normally, I wouldn't be on board with painting an original piece, but this isn't exactly antique.  Probably 70's.  And with the damage, there was really no way around it.

So two coats of flat acrylic and one good waxing later, we had a bright white table........


I really love how it turned out.  How the paint brought out the detail in the table base.  And how fresh and clean it feels.


This room is slowly evolving!  First the chandelier update and now the table!  Next up, painting the walls.

Goodbye lime green!


Linking up with:  The Chicken Chick

Sunday, August 21, 2016

That One Time I Met a Bachelor....


Summer summer summer.

While it's still here in season, it's gone really.  School started two weeks ago, so it's back to being a weekend warrior.  But that's okay, because this summer was a good one.  The longest one in years.  We clocked just shy of three months off.  I had lots on my "to-do" list, but one of my main goals was to get to the beach.......and we did.......


We went to Naples, Florida!  We did a lot of exploring this time (versus the last time where we hit up lots of tourist spots). Meaning, we took some road trips!  We drove to Sanibel Island..........


And we drove to the Keys..........


We chased sunsets at our favorite spot.......


And at our favorite beach, this happened..........


I met Chris Soules, a former Bachelor.

As a forever fan of the show, this was monumental.  So monumental I couldn't form a string of words to say to him.

All thanks to the mister.  Because I wasn't going to approach him.  The mister made it happen.  And I'm not mad about it.

I mean, look at my ridiculous face!


Thursday, July 7, 2016

The Revival of Macrame


Macrame.  A lost art?

Think again!  Macrame is back in a big way!  In fact, it's back and hanging in the room I'm staging as an office!  I told you I was changing up the vibe in this house.


I love how this piece adds depth and texture to my office wall.  I also love how you just don't see macrame everywhere.........it's different, maybe unexpected, and definitely one of a kind!  Not to mention, it's the work of a fiber artist, my friend Layne.  She made that beautiful piece.

But let's back up a little bit.

Not too long ago, my friend Layne asked to interview me about my favorite hobby!  She wanted to know a little bit more about my thrifting skills.  Funny thing is, I wanted to know a little bit more about her favorite hobby too.........macrame!  So we traded interviews!  You can check out my interview at her blog The Room Journal.  And you can stay put to hear more about Layne's favorite hobby.......

How did you get into macrame?
My dad got me interested in macrame.  He made a lot of plant hangers, etc, back in the 70's, and he taught me a few knots. But then I became obsessed with it a few years ago when I discovered the work of Sally England.  Seeing her work made me start getting serious about learning more advanced knots.  I am self-taught, using vintage macrame books and YouTube videos.

Tell me about your Etsy shop name Viola Maye....
When I first started my Etsy shop, I called it "Eck Art."  I just couldn't think of a anything pretty, so I went with something silly. But I really wanted to find a name that had a nice sound to it.  Then one day I was digging through a drawer and came across something that had my grandma's first and middle name on it, and realized how much I liked the sound of her name, so I went with that.

What different items can you make? 
I offer pre-made and made-to-order macrame items, including wall hangings and plant hangers.  I also take custom orders.

What materials do you use?
I use cotton rope.  I also use driftwood I find along the coast of Puget Sound.

What gave you the idea of finding driftwood along Puget Sound to use?
I've noticed so many macrame artists using lots of different things to tie knots from ~ dowels, copper rods, lucite, driftwood, etc.  I've always loved the driftwood the best, so I was pretty thrilled when I discovered my new home in the Pacific Northwest had plenty of interesting pieces of driftwood everywhere I look.


*   *   *   *

I have driftwood from Puget Sound hanging in my house?!?!?!  That is pretty darn cool!!!  AND YOU COULD TOO!  Layne is offering 20% off orders over $50!  Use the code VINTAGEGROVE20 to receive the discount!  Hop on over to Viola Maye to snag a beautiful piece of your own!  Or you can buy the piece named Evelyn for ME.  I have lots more wall space to fill, and I've had my eye on Evelyn since she added it to her shop!

We can call it an early Christmas present!


*   *   *   *

You can find Layne on the internets at.....
*her blog: theroomjournal.com
*on Instagram: @layneeckhardt


Linking up with Two Thirty-Five Designs

Sunday, June 12, 2016

Ceiling Medallions and Chandeliers


DIY projects are not foreign to us.  We've done plenty, most in our previous home.  There are a few things we've tackled that were pretty intimidating.  But this one?  This one takes the cake.

It all started back at our old house when I told the mister that the dining room chandelier was going to be a reserve item.  I was taking that baby with me.  I had grand plans.......to hang it in our new dining room along with a certain ceiling medallion.  The fixture in our new dining room was dinky, and I felt like our chandelier would fill the space better.  Not to mention, chandeliers are $$$$, so taking it with us was thrifty!

Taking it down and packing it was no small feat.

But hanging it annnnd a ceiling medallion goes down as our hardest DIY to date.  Maybe because chandeliers are heavy. Probably because our 95 year old ceiling isn't 100% level.  But most likely because both of us are perfectionists.

When it was all said and done though, we were both very happy with the results....


And now if anyone needs a tutorial on how to hang a ceiling medallion, I'm your girl.  Or you could get the gist from this short Flipagram......


I swear I helped!  Somebody had to stop and take pictures every once in awhile.........


Sunday, May 29, 2016

Crazy Plant Lady


I've become a little obsessed with plants lately (even though my track record isn't the best).

I blame Instagram and Pinterest.

Images of eclectic, bohemian-esque rooms with greenery everywhere are suddenly speaking to me. It's probably because I'm changing up the vibe in this house.  It might be because this house has such great natural light.

I could also use the excuse that I have a difficult-to-style living room.

This room is huge.  It really has two different sitting areas in one large rectangular space.  It's tricky.  Soooo plants to the rescue.

My first purchase......a fiddle leaf fig from a local nursery.........


Not a cheap plant.  Especially if you're good at killing them.

Anyway, as you walk into this monstrous room, straight ahead is a large wall.  That large wall is home to our TV stand.  The only outlet is about three feet away from where the TV has to be (because of the configuration of this room).  Two huge cords hang from that outlet to the TV.

I was dying to cover those cords. But another piece of furniture just didn't make sense there.

That's when I decided I would try a plant grouping next to the entertainment center!  This would cover the cords and help fill that open space.  I bought two more plants and thought putting them in baskets would add texture.  I thrifted the outer baskets and found the middle basket at Target......


Mission accomplished!?

When I open my front door now, I'm greeted with greenery instead of a blank wall with a string of cords.  It makes me happy.

What would make me even happier?

Keeping my fiddle leaf alive.....


Give me alllll the advice you've got, people.

My fiddle leaf is begging you.


Saturday, May 14, 2016

Vintage Rug Dreams


Have you ever scared a FedEx driver by doing a little jig on the porch as he walked up your steps with an extra exciting delivery? It's possible that happened here a few months ago when my vintage Turkish rug was delivered.

Yes.  Months ago.  And I'm just now showing it off?  Yep.  For a great reason.  I could not find a rug pad in this town that I deemed good enough for this antique baby of mine.  And without a rug pad, the rug was bunching and shifting a lot.  So I rolled it up and put it away until recently......


More on the rug......when we got our new furniture, I knew I wanted a rug to anchor the space.  I knew I wanted a vintage kilim. And after lots of online searching, I found the perfect one via the Turkish Rug Man!  I loved the design and colors, and of course, it was just the right size!


But, like I said, it wasn't staying in place on slick hardwood floors without a rug pad, since vintage kilims are thinner than rugs tend to be nowadays.  So the day it was delivered, I went to - no joke - FIVE STORES in town to look for a rug pad.  All I found in each store was a pressed plastic pad, which I'd had no luck with in the past.  Which tend to smell a little chemical-esque. Which I feared would damage the rug and possibly, the hardwoods too, which are original to our house!

There was no way I was putting a plastic pad under this vintage dream of mine.

Enter the Rug Pad Corner who completely saved the day!  They make pads that are 100% chemical and glue free.  This meant, no strange smell coming from the pad.  It also meant that my rug and floors would not be damaged.  Annnnd they are made in the USA!

They had a few to choose from that would work with hardwoods floors.  I decided to go with one called the Ultra Premium. The Ultra Premium rug pad is everything I'd hoped for.  First of all, when I opened the package, there was no scent to the pad at all!  No chemical smell whatsoever.  Next, the pad flattened out immediately!  I didn't have to wait to throw the rug on top! The felt side went against the rug and held it in place.......


Since vintage rugs tend to have odd dimensions, another feature I love, is that they are made and cut to be custom to your rug! They cut mine to be just a tad smaller than my rug, meaning no pad peeks out!

During the short time I actually left the rug out - pre-pad - my rug would shift a lot, especially with my rambunctious pups. Once the pad was underneath, my rug has not budged an inch.  It would also bunch up under the coffee table before.  Now there is no bunching, since the felt seems to adhere to the rug, and the rubber side grips to my hardwoods nicely......


The pad also adds a little depth to my pretty thin rug!  It's about 1/3" thick, which is the perfect amount of cushion underfoot!

To say I'm happy with this pad is an understatement.  For any future rugs I purchase, vintage or not, I will definitely be using a pad from the Rug Pad Corner.  And you should too!  Use the code REVIEW15 for 15% off your purchase!

Good thing I wasn't home when the rug pad was delivered.  I would have scared the UPS driver too!  I was so excited about finally getting put the rug down for good, I might have tackled him!


*I received this rug pad in exchange for an honest review via the Rug Pad Corner!*

Monday, May 2, 2016

The Backyard


With summer only NINE school days away, the backyard has been getting all of our attention!  I wish I'd taken before photos! We've done so much that I didn't think to document......

  • A huge brush pile had been left behind, so we took a trip to the yard waste center.  
  • We've also gotten familiar with the city dump, since we had to take a huge trash pile that was left behind.  
  • Then there's the pea gravel that covers about half the green space.  We are slowly hauling that off.  
  • Lastly, two raised garden beds took up a huge portion of yard near the house, so we removed that in order to eventually add a patio area.

It's starting to feel like a blank canvas!  

We did stage a sitting area up by our sun porch.  I've always dreamed of hanging string lights, so that was my first addition to the backyard......


My second addition was for our sun porch!  We found a vintage table and chair set on Craigslist for that space......


Nothing a fresh coat of paint can't fix.

So finished or not, I'm ready to have some backyard gatherings!  Some lazy summer nights under the string lights.  A little fire in the chiminea.

And, of course, food!  Always food.


Saturday, April 23, 2016

Blogging for Books


Recently I discovered the site Blogging For Books via a local friend's blog.  She received a popular book for free in exchange for an honest review on her blog!  Uhhhh, SIGN ME UP!

When you sign up, you get to select one book, which they send you, free of charge.  Your job is to read it and write up a post!

I selected Clear Your Clutter with Feng Shui by Karen Kingston.


The title spoke to me.  Not only because of the feng shui part, but the "clear your clutter" part too.  It IS the year of the purge around here.  So I thought it would bring my curiosity of the art of feng shui and my decluttering game together.  Feng shui has always interested me.  I really didn't know much about it, but was ready to learn more.

I'll be honest.  I didn't learn much about feng shui the way I was hoping to.  I was hoping I'd learn the art of staging a home based on the principles of FS while keeping it clutter-free, but instead it focused on figuring out the "why" behind clutter in many areas of life (even emotional clutter) and the negative way clutter can impact your life.

I knew feng shui was sort of out-there.  Based on energies and spirituality.  Some of that I can get behind.  Some I cannot.  The notion that a home has "imprints" of previous tenants that can negatively or positively effect your home life is one I am not sure I can subscribe to.

Another area that the book really focused on was identifying clutter areas.  I guess people can really struggle with that.  To me, clutter is obvious.  So the large section devoted to that topic was, for me, unnecessary.

Overall, I felt like out of the three parts this book is divided into, Part 1 was the only part I really enjoyed.  Chapter 8 included diagrams of the part of feng shui I was interested in, how a home is divided into zones and how those zones can impact different aspects of your life.  It just didn't go deep enough.  I was left wanting more out of this section of the book.

In the end, I couldn't go into a room and stage it, clutter-free, using feng shui.  Which is what I'd been expecting to learn.

Nonetheless, it was an easy read.  It did make me think about "why" I hang on to things.  And it did make me eye roll more than once.

Now I can look forward to selecting another book though!  Maybe I'll shoot for fiction.


I received this book from Blogging for Books for review.


Saturday, April 16, 2016

A Front Door Makeover


From day one I have always had major heart eyes for the exterior of our home.  I like the green and ivory color scheme.  The porch is an absolute dream.

But it needed something to amp up the curb appeal.

Enter a simple and cheap project:  painting the front door.

It was a dark green ~ with a missing storm door and large stand alone mailbox......


It needed a punch of something.  We weren't sure what, so we were off to Lowe's for a million paint samples.......


I tried three different blues in shades of navy (or so I thought), two different reds, and a terra cotta that turned pink.

The second red, Heirloom Red by Valspar, was the winner......


We ended up selling the huge stand alone mailbox in my booth (HA!!!) and replaced it with one I had thrifted for $2.98.  We spray painted it to match the shutters.  We also added a custom storm door, which was not cheap, but truly worth every penny.

I love the light it lets in during the day.  And the pups love their new lookout.........


And what's a newly vamped front door without a fun doormat?

Or concrete planters.......


I knew I wanted two of these exact planters.  I scoured Springfield looking for them.  No luck.  Until I remembered a statuary place north of town.  And BINGO!  

So a few ferns by the door and mandavillas in planters and we have curb appeal......


To me, anyway.


*   *   *   *

Check out Instagram for a peek at our backyard!  
Hint....two words:  STRING LIGHTS!!!!


Saturday, April 2, 2016

1921 Craftsman Update


We have slowly but surely started on some projects around here!  And while we are not done with any particular room, progress is being made!

Since we bought a new sofa and chair, it only made sense to paint the living room first.

The mister repainted all the dirty (already white) trim with a high gloss white.  For the walls we went with a soft gray (Valspar's Silver Leaf).  Oh my goodness, what a difference some paint can make on the whole feel of a space.

Here is a before and after all in one shot.  On the left of the trim is the before, a butter color, and on the right, a very messy dining room table (#reallifeyo) and the new gray......


It feels so clean now!  And brighter!  That butter color was getting me down.

The fireplace got a makeover too.  It went from ivory to high gloss white.......


I am still dying over the update.  So much better!  So fresh looking!  So bright!


(Eventually we plan to recover my vintage sofa, get a different rug, and update the light fixture.)

The last thing we did was get new curtains!  I wanted to keep with the fresh, clean feeling, so I went with "Cool White" cotton curtains from JCPenney.  The new brushed nickel rods are from there too.....


This room has great natural light, and I feel like these curtains are in keeping with the fresh, bright feel.  Even when it's raining outside.

*   *   *   *

So there you have it!  The 1921 Craftsman is slowing taking shape!  Next up, some adventures in amping up the curb appeal!

And if you can't wait to see what that is, check out my Instagram, where I've already shared that little update!


*Affiliate links for curtains/rods present within post*

Sunday, March 20, 2016

Boothiversary


FIVE YEARS!!!!!!!!!  Five years of the best hobby ever!!!

It started with one space, and now I'm up to three!  I'm still having so much fun!  And this endcap is still my baby........


Don't get me wrong, I love my other two spaces also!  The endcap is just the flagship spot!

Local friends........the booths are on sale to celebrate my five year boothiversary!!!  Stop by Relics, and let me know if you snag something!

Oh, and like the booth on Facebook to keep tabs on newly added items!


Friday, March 11, 2016

Thrift of the Century


For as long as I can remember, I've dreamed of owning a home with a clawfoot bathtub.  Our new old home does not have one. But it does have an upstairs bathroom that we will gut completely someday.

Anyway.

Yesterday.

I was leaving a local thrift shop.  This particular thrift requires you to drive behind the shop to exit, due to the parking lot being a one-lane-one-way situation.  I was pulling around back and was on the phone with the mister when I spotted it by the backdoor of the thrift.

A vintage clawfoot bathtub.  

I screeched out an, "I'll call you back!"  Then I abandoned the car and scrambled to the shop's donation door.

I think I must have looked crazed.  My heart was racing.

The employees got the manager for me.  She came out and said it had JUST been donated so it hadn't been priced.  I told her that I wanted it.  Then she spoke the most magical words I have ever heard (except for the time when the mister proposed)......

"How about $37.48?"

WHAT????????????

The inside of this tub is pristine.  As in it has zero rust, no worn porcelain.  It has all four feet.  THIS DOES NOT HAPPEN!!!!!

THIRTY-SEVEN FORTY-EIGHT?

So, I went up to the register to pay.  (Side note:  the DAV has this "check-in" thing where you can get deals every so often if you've registered with them.)  I checked in.  AND YOU WILL NOT BELIEVE THIS, but my deal was $5.00 off a purchase!  

I was getting this mint condition clawfoot tub for THIRTY-TWO DOLLARS AND FORTY-EIGHT CENTS?


(This is the wall side of the tub.....the other side 
is finished and will only need to be painted.)

*   *   *   *

Later when I went back to pick it up, the employees said they could have sold it two more times in the hour they'd had it.

*   *   *   *

Measurements have been taken, and I am 99% positive it'll make it upstairs when the day comes.   Until then, you might find me laying in it....... 


#thriftofthecentury


Sunday, February 28, 2016

Booth Update


Three booths, two-months-in checkup..........so far, so good.

Actually, better than good!

January and February can be tough months in antique-booth-world, but (knock on wood) I've had my best months ever since snagging a third space.

I can't keep old windows in stock.  Vintage clothing is doing well.  And a whole lotta random is selling!


I'm purging from my stash (and our storage units), which was a 2016 goal.  But I haven't been a stranger to the thrifts, if I'm being honest.  I just can't stay away from them.

Thrifts are my kryptonite.

Here's hoping the next few months are just as successful so I can keep purging.

(And thrifting.)